First: Identify Your Crystal Type — This Changes Everything
Watch repair has gotten complicated with all the conflicting advice flying around. Last summer I scratched my vintage Seiko cleaning it with a microfiber cloth — yes, a microfiber cloth, the thing everyone tells you is safe. Panicked, I immediately ordered Polywatch off Amazon and started buffing away. Twenty minutes in, I realized I had absolutely no idea what crystal I was even working on. That mistake cost me time, money, and honestly made me look pretty foolish when I finally called a watchmaker.
Crystal type determines everything about your repair strategy. Acrylic, mineral, and sapphire respond completely differently to the same treatment. Get this wrong and you’ll either waste $15 on products that do nothing or destroy the crystal entirely.
The Water Drop Test
Place a single drop of water on the crystal. Just watch. On acrylic, it beads up into a tight little ball. On mineral glass, it spreads slightly — more relaxed. On sapphire, it flattens and spreads aggressively. Sapphire is hydrophilic. It actually pulls water toward it.
This test takes five seconds. Do it first.
The Fingernail Test
Gently try to scratch the crystal with your fingernail. A fingernail sits around 2.5 on the Mohs scale — not exactly diamond territory. Acrylic scratches easily. Mineral glass resists your nail. Sapphire just laughs at your fingernail. Completely impervious.
Leave a mark with your nail? Acrylic. Can’t leave a mark? You’ve got mineral or sapphire. Run the water drop test to separate those two.
Check the Dial Printing
Older watches — especially vintage models from the 1970s and earlier — almost always have acrylic crystals. Mid-range watches from the 1990s onward lean toward mineral glass. Premium watches from basically any era use sapphire. Age and original price point give you a solid first clue, but honestly, the water and fingernail tests are your definitive answer every time.
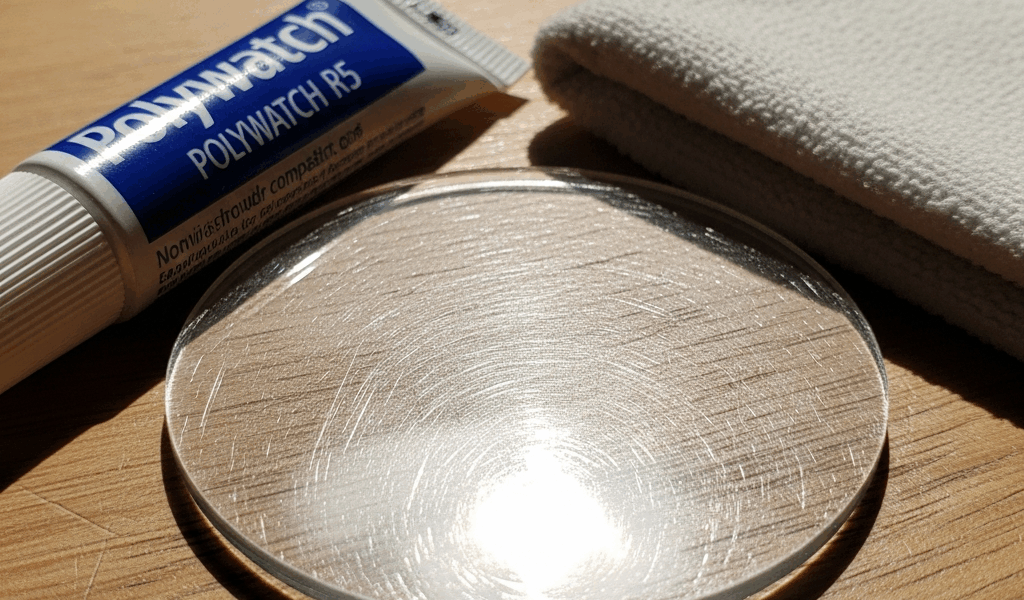
Acrylic Crystal: Polywatch Fixes Everything
Probably should have opened with this section, honestly. It’s the most straightforward fix in watchmaking, and acrylic crystals are everywhere. That 45-year-old watch sitting in someone’s junk drawer almost certainly has one. Polywatch is a fine abrasive compound — German-made, about $8 on Amazon — that removes the damaged surface layer, essentially erasing the scratch from existence.
What You’ll Need
- One tube of Polywatch (the original, from Germany — roughly $8 on Amazon)
- A microfiber cloth, soft cotton cloth, or lint-free cloth
- Tap water for rinsing
- Patience for 2–3 minutes of continuous work
The Application Process
Squeeze a pea-sized amount of Polywatch directly onto the scratched area. Not onto the cloth — onto the crystal itself. The compound is white and opaque, looks almost like toothpaste.
Using firm, circular motions, buff the scratch for 90 seconds straight. Your arm will get tired. Keep going anyway. Friction generates heat, which activates the compound. You’ll see the crystal start looking clearer under the scratch as the abrasive particles do their thing.
Wipe away the compound with a damp cloth. Assess the scratch. Gone or significantly lighter? You’re done. Still visible? Repeat — another 90 seconds of buffing, then wipe and check again.
Most light-to-moderate scratches disappear completely in one application. Deep scratches may need two or three rounds. I’ve personally never needed more than three.
Expectations vs. Reality
Polywatch cannot remove extremely deep scratches — the kind where you can actually feel the groove with your fingernail. It works by ablating the surface layer, so the scratch has to be shallow enough that aggressive buffing reaches the bottom of it. For shallow scratches, success rate is nearly 100%. For deeper ones, expect 70–80% improvement.
The crystal won’t look brand new. But it will look dramatically better. A scratch that was clearly visible becomes almost invisible — especially to anyone not specifically hunting for it.
Cost: $8–12 per tube, and one tube lasts through dozens of repairs.
Mineral Crystal: Limited Options
Mineral glass sits in an awkward middle ground. Harder than acrylic, vastly softer than sapphire. It represents roughly 60% of the watch market — too many watches to ignore, too limited in repair options to get excited about.
Light Scratches: Cerium Oxide
Cerium oxide might be the best option here, as mineral glass requires something finer than Polywatch but still abrasive enough to actually cut. That’s because cerium oxide sits around a 7 on the Mohs scale — aggressive enough to work, gentle enough not to cause new damage. Apply it the same way as Polywatch: small amount directly on the crystal, circular buffing motions for 1–2 minutes, rinse and evaluate.
Cerium oxide works on light scratches. Deeper than light, and you’re hitting diminishing returns fast. Don’t chase it.
Cost: $10–20 for a small container that lasts through many repairs.
Deep Scratches: Replacement Time
If the scratch is deep enough to see from the side — or feel with your fingernail — polishing won’t fix it. Two options: accept it, or replace the crystal.
I know someone who tried aggressive buffing on a deep mineral scratch. Buffed so hard and so long he actually thinned the crystal enough to create a visible depression. He replaced it anyway. Two wasted hours, still needed a $30–50 replacement. Don’t make his mistake.
Mineral glass replacement typically runs $25–50 depending on watch size and your watchmaker’s labor rate. A 36mm crystal runs cheaper than a 42mm — usually $10–15 cheaper just on parts. If the scratch genuinely bothers you, replacement is the honest answer. Polishing a deep mineral scratch is not.
Sapphire Crystal: Do Not Try DIY
Sapphire ranks 9 out of 10 on the Mohs hardness scale. Diamond scores higher. That’s it. That’s the whole list of things harder than your watch crystal. Your Polywatch sits around an 8 on that scale. Your cerium oxide? About a 7. Rubbing either of those on sapphire accomplishes essentially nothing — you might as well use butter.
Some people report success using 0.5 micron diamond paste specifically — but the risks are steep enough that I’d steer most people away entirely.
Why DIY Diamond Paste is Risky
Diamond paste is designed for polishing diamonds. It’s aggressive. On sapphire, you might remove a microscopic layer of material — or you might gouge or haze the crystal if your technique drifts even slightly. Sapphire is scratch-resistant, not scratch-proof. The wrong abrasive applied the wrong way creates new damage on top of old damage.
Professional watchmakers have specialized equipment — rotary polishing tools, controlled pressure rigs, the right felt bobs. They can feather the edges of a scratch to make it far less visible even when full removal isn’t possible. You, working alone at your kitchen table with a cloth and a tube of paste, cannot replicate that. I’m apparently a reasonably handy person, and professional-grade sapphire polishing works for experienced hands while amateur attempts never end well.
Professional Polishing vs. Replacement
A professional sapphire crystal polish runs $50–100 in labor alone. Replacement sapphire crystal material costs $20–40 for most watch sizes, with installation adding another $30–50. Total replacement: $50–90. Total professional polishing: $50–100.
For light scratches on a sapphire, professional polishing makes sense. For deep scratches, replacement makes more sense — you’re paying nearly the same amount either way, and a new crystal is definitively better than a polished-but-still-damaged one.
When to Just Replace the Crystal
Not every scratch deserves a polishing attempt. Sometimes replacement is faster, cheaper, and more honest about what the damage actually is.
Replacement Costs by Crystal Type
- Acrylic: $15–35 for the crystal, $20–40 labor (most affordable option)
- Mineral: $20–45 for the crystal, $25–50 labor
- Sapphire: $30–60 for the crystal, $30–60 labor (most expensive option)
These are average prices from independent watchmakers in major U.S. cities. Chain jewelry stores charge more. Authorized service centers charge significantly more — sometimes two or three times more for the exact same job.
Where to Get Replacement Crystals
For common watch models, replacement crystals are available on Amazon, eBay, or specialized sites like esslinger.com. A replacement crystal for a Timex Weekender costs about $8. A replacement for a Citizen Eco-Drive runs $15–25. A generic mineral crystal in a 34mm size typically falls between $12–20.
DIY crystal replacement is possible — if you own a crystal press or removal tool. Most people don’t. A crystal press runs $30–100 depending on quality. For a one-time job, taking it to a watchmaker saves money and guarantees the crystal seats properly without damaging the bezel or dial.
When DIY Replacement Works
Some watches have crystals that practically fall out. Old Seikos, many vintage Citizens, simple dress watches — these often use friction-fit crystals with no adhesive. Pop them out by gently prying under the edge with a soft plastic spudger. Replacement is just pressing them back down evenly. That’s genuinely doable at home.
Watches with adhesive-bonded crystals — many modern sports watches — are a different situation entirely. You have to clean away old adhesive and apply new adhesive correctly. One wrong move and glue smears across the dial. Nearly impossible to remove without causing more damage.
The Decision Tree
Vintage or budget watch? Probably acrylic. Polywatch for light scratches, replacement for deep ones. Mid-range modern watch? Probably mineral. Cerium oxide for light scratches, replacement for deep ones. Nice watch? Probably sapphire. Leave polishing to professionals, or just replace it.
Deep scratch and genuinely unsure? Replacement is the safe call every time. A $40 crystal replacement preserves your watch’s value far better than an aggressive buffing session gone sideways.
That Seiko I mentioned at the start — the scratch wasn’t actually that deep. I could have replaced the crystal for $35 including labor at the shop two blocks from my apartment. Instead I spent an hour buffing, achieved maybe 70% improvement, and still ended up spending $40 on parts and labor afterward. Assess the damage honestly. Choose your method carefully. Don’t let impatience make the decision for you.


Stay in the loop
Get the latest ichronos updates delivered to your inbox.